.png)
Indulge in the divine fusion of a crumbly, buttery tart shell enveloping a rich and fudgy brownie – a sensation so irresistible that my daughter couldn’t resist finishing three Brownie Tarts within just one day!

Crafted with the finest 64% dark couverture chocolate and Dutch-processed cocoa powder, our brownie boasts an intensified chocolatey essence, harmoniously balanced with the indulgent sweetness of Nutella spread. The bitterness from the dark chocolate dances in perfect tandem with the Nutella, creating a delightful symphony of flavours without overwhelming sweetness.
As a finishing touch, these Brownie Tarts are adorned with a dusting of icing sugar and a decadent drizzle of Nutella spread. It’s a perfect dessert for holiday and festive celebrations, each bite encapsulates pure goodness and leaves an irresistible craving for more!
For more festive or party desserts recipes, try my Nutella Puff Pastry Christmas Tree, Easy Mini Cheesecakes and Ondeh Ondeh Scones.

RECIPE HIGHLIGHTS:
Decadent Fudgy Brownie: Rich and delicate, made with a blend of 64% dark couverture chocolate and Dutch-processed cocoa powder for an intensified chocolate experience.
Buttery Tart Shell: Crumbly and buttery fragrance, providing the perfect foundation for the luscious brownie filling.
Nutella Infusion: Generously filled with Nutella spread, creating a delightful balance that complements the bitterness of the dark chocolate without being overly sweet.
Garnished to Perfection: Adorned with a sprinkle of snow powder or icing sugar for a touch of elegance and a drizzle of Nutella spread for an indulgent finish.
Holiday/Festive Delight: An ideal dessert for the holiday and festive season celebrations, bringing a bundle of joy to every gathering.
Irresistible Sweet Treats: Each bite is a harmonious blend of flavours, leaving you wanting more with every indulgent mouthful.
Individual-Sized Portions (Tart Size 8cm): Enjoy the decadence of a perfectly portioned fudgy brownie nestled in a crumbly, buttery tart shell. These individual servings make them ideal for gatherings or parties.
Servings: 6 Brownie Tarts.

INGREDIENT NOTES:
1.FOR THE TART SHELL:
All-Purpose Flour: Measure the flour accurately for a consistent texture in the crust.
Unsalted Butter, Cold: Ensure the butter is cold to achieve a flaky texture in the crust.
Extra Fine Almond Ground: Adds a subtle almond flavour to the crust.
Whole Milk Powder: Enhances the richness of the crust.
Salt: Balances the sweetness and enhances overall flavour.
Ice Water (4-6 Tablespoons): Add gradually; the amount may vary, and the goal is to achieve a crust dough that holds together.
2. FOR THE BROWNIE FILLING:
64% Dark Couverture Chocolate Buttons: Use high-quality chocolate for intense chocolate flavour.
Unsalted Butter: Add Richness to the brownie; ensure it’s melted and well-mixed.
Caster Sugar: Use extra Fine sugar for smooth texture.
Light Brown Sugar: Adds hint of caramel flavour.
Large Eggs (1 Large Egg + 1 Egg Yolk): Contributes to the fudgy brownie texture; ensure proper incorporation into the batter.
Vanilla Extract: Enhances the chocolate flavour; use pure Vanilla extract for best results.
All-Purpose Flour: Measure accurately for the right consistency in the brownie.
Dutch-processed cocoa powder: Dutch-processed cocoa powder has a more intense and concentrated chocolate flavour, making it suitable for recipes where a robust chocolate taste is desired. Dutch-processed cocoa powder is characterized by its darker color, often a deep brown, and has a more reddish hue compared to natural cocoa powder. It’s dissolving easily for rich chocolate desserts.
Blend of Arabica & Robusta Rich and Smooth Coffee Powder: Enhances chocolate flavour.
3.FOR THE NUTELLA FILLING:
Nutella hazelnut spread: Adds 1 teaspoon of Nutella for each brownie for a creamy and indulgent filling.
4.FOR THE GARNISHING:
Snow Powder or Icing Sugar: Snow Powder also known as snow sugar or dusting sugar. It is a non-melting form of powdered sugar or icing sugar, often used for dusting on top of cakes, pastries, and other sweet treats to create an appealing snowy effect.

WHAT YOU WILL NEED TO MAKE BROWNIE TART:
1. FOR THE TART SHELL:

2. FOR THE BROWNIE FILLING:

STEP BY STEP INSTRUCTIONS FOR THE TART SHELL:

1.Create the Flour Mixture: In a large mixing bowl, combine the all-purpose flour, extra fine almond ground, whole milk powder, and salt. Mix them thoroughly to ensure an even distribution of flavours.


2. Incorporate the Butter: Cut the cold unsalted butter into small cubes and add them onto the flour mixtures. Using a pastry cutter or your fingertips, rub in the butter into the flour until the mixture resembles coarse crumbs.

3. Add Ice Water Gradually: Drizzle ice water over the mixture, starting with 4 tablespoons. Gently mix with a fork or your hands until the dough just begins to come together. If needed, add more ice water, one tablespoon at a time, until the dough forms a cohesive ball.


4. Chill the tart dough: Scrap the dough onto a piece of food-grade plastic wrap and use your hands to bring it together and shape it into a disk about 1-inch thickness. Wrap it tightly and chill in the refrigerator for at least 30 minutes.


5. Wrap A Mould: Use a cupcake or muffin mould wrapped tightly with food-grade plastic wrap. Set it aside for shaping the tart shells usage later.


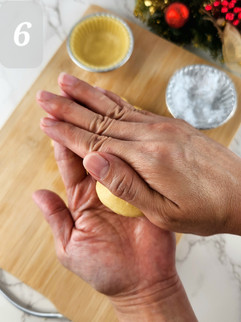


6. Shape A Tart Shell: After the dough is chilled, remove them from refrigerator. Divide equally the chilled dough into 6 portions. Gently roll each portion into a round ball. Place a dough ball into a lightly grease cupcake or muffin mould. Use your fingertips to lightly press down to flatten dough onto the bottom of cupcake or muffin mould. Use another wrapped cupcake or muffin mould to press down the dough onto the side of mould, to create a uniform and beautiful tart shell. Use a small knife to trim any excess dough. Repeat this step to make another 5 tart shells.

7. Dock A Tart Shell: Docking a tart shell refers to the process of pricking the bottom of the tart shell with a fork. The purpose of docking is to create small holes or perforations in the dough to prevent it from puffing up excessively during baking and helps to ensure an even, flat and properly baked crust. Once the tart shell is docked, freeze it in the freezer for about 30 minutes. This helps to prevent your tart shell from shrinking during baking.

8. Preheat the Oven: While the dough is chilling in the freezer, preheat your oven to 320°F (160°C).
9. Bake in the preheated oven at 320°F (160°C): for about 25-30 minutes or until the tart shells turn light brown colour.

10. Cooling: Once baked, remove them from oven and transfer it onto a wire rack. Let the tart shells cool down completely in the cupcake or muffin mould.

11. Get the Tart Shells Ready: Once the par-baked tart shells have cooled down, remove it from the mould and transfer it onto a baking tray. Set aside for later use. Next, you can start to prepare the brownie filling.
STEP BY STEP INSTRUCTIONS FOR THE BROWNIE FILLING:


1.Preheat the Oven: to 356°F (180°C).
2.Prepare the Cocoa Mixture: In a large heatproof bowl, melt the 64% dark couverture chocolate buttons with the unsalted butter on double boiler. Stir until smooth.

3. Combine Sugars: When butter and chocolate are melted, add in the caster sugar and light brown sugars. Stir until the sugars are dissolved and well-combined.

4. Incorporate the Eggs and Vanilla Extract: Stir in the eggs (1 large egg + 1 egg yolk) and Vanilla Extract, mix well until it’s incorporated.


5. Mix Dry Ingredients: Add cocoa powder and coffee powder, whisk to combine. Add all-purpose flour, stirring continuously for a homogeneous batter, takes about 1-2 minutes.


6. Fill in the batter: Transfer the brownie filling mixture into a piping bag without nozzle. Fill in the ½ batter onto a par-baked tart shell. Add a middle layer of 1 Teaspoon Nutella. Fill in the cover layer ½ batter to a par-baked tart shell.


7. Bake to Perfection: Bake in the preheated oven at 356°F (180°C) for 14 minutes or until the brownie filling is set and puffed up.

8. Cooling: Once baked, let the brownie tarts cool down on the baking tray.


9. Finishing Touch: Once cooled, dust lightly with snow powder or icing sugar for a decorative touch and drizzle with Nutella spread in a zigzag line design for an elegance visual touch. Happy Baking!

PRO TIPS FOR THE TART SHELL:
Butter Temperature: Ensure the butter for the tart shell is cold; this helps achieve a crumbly and flaky texture in the crust.
Gentle Mixing: When adding ice water, mix the dough gently. Overmixing can affect the texture; stop as soon as the dough forms a cohesive ball.
Chilling Time: Allow the tart dough to chill for at least 30 minutes. This ensures the butter solidifies, contributing to a more tender and flavourful crust.
Uniform Tart Shells: Use another cupcake or muffin mould wrapped in plastic wrap to achieve uniform tart shells. This ensures a consistent and appealing presentation.
Docking Importance: Don’t skip the docking step; it prevents excessive puffing during baking, resulting in an even, flat, and perfectly baked crust.
Freezing Before Baking: Freezing the docked tart shells for 30 minutes helps prevent shrinking during baking, maintaining the shape and structure.
PRO TIPS FOR THE BROWNIE FILLING:
Proper Preheating: Preheat the oven to 356°F (180°C) for an optimal baking environment that ensures even cooking.
Double Boiler with Gentle and Even Heat: A double boiler provides a gentle and even heat distribution, preventing the chocolate from scorching or burning. This is crucial for achieving a smooth and velvety texture in the melted chocolate. Keep the water in the double boiler at a gentle simmer, avoid rapid boiling to prevent overheating the chocolate.
Chocolate and Butter Melting Technique: When melting the dark couverture chocolate buttons with butter, stir consistently with a heat-resistant spatula or spoon to achieve a smooth texture and prevent burning.
Sugar Dissolving: Ensure sugars are fully dissolved in the chocolate mixture for a smooth and velvety brownie consistency.
Homogeneous Batter: Whisk the dry ingredients into the wet mixture continuously for 1-2 minutes to achieve a homogeneous batter, resulting in a consistent texture.
Layering Technique: When adding Nutella filling, create a middle layer to surprise the taste buds with a burst of chocolate hazelnut flavour.
Even Filling: Fill the tart shells evenly with the brownie batter to ensure consistent baking and a visually appealing result.
Temperature Monitoring: Keep an eye on the baking time for the brownie filling to achieve a perfectly set and puffed-up texture. Adjust time if needed.

FINISHING TOUCH PRO TIPS:
Creative Dusting: Use snow powder or icing sugar creatively for a decorative touch, enhancing the visual appeal of your Brownie Tarts.
Drizzling Technique: Drizzle Nutella in a zigzag line design for an elegant visual touch, adding a final flourish to your delectable creation.
Wait for Cooling: Allow the brownie tarts to cool completely before garnishing. This helps maintain the structural integrity and prevents melting of the Nutella drizzle.
SERVINGS TIPS:
Create a Dessert Platter: If serving at a gathering, arrange the Brownie Tarts on a decorative platter for a visually stunning dessert centerpiece.
Accompany with Coffee or Tea: Pair these rich Brownie Tarts with a cup of hot coffee or tea to complement the chocolate flavours and create a well-rounded dessert experience.
Enjoy Fresh: These Brownie Tarts are best enjoyed fresh, so savor them at their peak deliciousness!

FREQUENTLY ASKED QUESTIONS:
Can I use a different type of chocolate for the brownie filling?
Absolutely! White the recipe calls for 64% dark couverture cocoa buttons, feel free to experiment with different chocolate varieties based on your preference, such as milk chocolate or a higher percentage of dark chocolate.
Can I make the tart shells ahead of time?
Yes, you can. After preparing the tart shells, you can freeze them until needed. Just ensure they are properly wrapped to prevent freezer burn. When ready to use, par-bake the frozen tart shells as directed in the recipe before adding the brownie filling.
Can I substitute almond ground with another ingredient?
Certainly! If you have nut allergies or prefer a different flavour, you can substitute almond ground with finely ground hazelnuts, pecans, or omit it altogether for a classic tart crust.
How do I know when the brownie filling is set?
The brownie filling is set when it has a slightly firm texture on the surface. You can perform a toothpick test by inserting it into the center; if it comes out with a few moist crumbs but not wet batter, it’s ready.
Can I make these Brownie Tarts gluten-free?
Yes, you can experiment with gluten-free flour substitutes for the tart crust. Ensure the flour blend is suitable for baking, and adjust the measurements accordingly.
How long do the Brownie Tarts stay fresh?
Brownie Tarts are best enjoyed fresh. However, if stored in an airtight container in the refrigerator, they can stay fresh for up to 3-4 days. Allow them to come to room temperature or reheat them in the oven before serving for the best taste and texture.
What can I use if I don’t have Nutella for the filling?
If you don’t have Nutella, you can use another chocolate spread as substitute.
Can I skip the coffee powder in the brownie filling?
Certainly! The coffee powder adds a subtle depth to the chocolate flavour, but if you prefer to omit it, the brownie filling will still be delicious without it.
Can I use a different shape for the tart shells?
Absolutely! While the recipe suggests cupcake or muffing moulds, you can use other tart moulds or even a larger tart pan for a single, larger tart. Adjust the baking time accordingly based on the size of your tart shells.
Remember to leave a star rating and let me know how it turned out in the comment section below if you’ve tried and loved this recipe. Your support means a lot to me ❤️

Comments