.png)
Get ready to experience a slice of heaven with our tantalizing Pistachio Raspberry Cake! A luscious pistachio-infused cake, delicately balanced with a burst of tangy raspberry filling made from natural, premium fruit preserves. What makes this recipe truly divine is the harmonious blend of finely ground pistachios, groundnut oil, creamy butter, and a touch of pure vanilla extract, creating a moist and tender crumb that melts in your mouth with every bite.

But that’s not all – our velvety ganache, crafted with a blend of homemade pistachio paste for a rich, nutty depth, and premium chocolate caramel callets with rich notes of toffee flavour, creates a decadent symphony of flavours. Additionally, the creamy pistachio buttercream frosting crowns each slice with pleasant sweetness, while a sprinkle of finely ground pistachios and fresh raspberries adds a pop of colour and a delightful crunch.

Whether you’re celebrating a special occasion or simply indulging in a moment of pure bliss, our Pistachio Raspberry Cake promises an unforgettable journey of taste and texture that will leave you craving for more. It’s a masterpiece that works like magic, bringing together the best flavours to create a dessert experience that’s simple irresistible.
Looking for more quick and easy cake recipes? Try Mini New York Cheesecakes, Ultra Moist Lemon Pound Cake, and Extraordinary Carrot Cake Loaf with Cream Cheese Frosting - each bite is a delightful journey waiting to be savored!

RECIPE HIGHLIGHTS:
Delightful Without Frosting: This luscious infused-cake is a delight on its own, showcasing a rich and nutty flavour that’s simply irresistible, even without filling or frosting. Perfect for those who prefer a lighter and less sweet option or for enjoying the pure essence of pistachios in every bite.
Easy and Approachable Recipe: Despite its gourmet flavours, this recipe is surprisingly easy and approachable to make, making is accessible for both novice and experienced bakers alike. With our clear instructions and the cake baking time is only 25 minutes, you can have this exquisite cake ready to impress in no time.
Rich Pistachio Flavour: The cake features a generous amount of finely ground pistachios, giving it a distinct and rich nutty flavour that sets it apart.
Tender Crumb: The combination of cake flour, baking powder, baking soda, and buttermilk results in a tender and moist crumb that melts in your mouth.
Decadent Pistachio Ganache: A homemade pistachio paste combined with premium chocolate caramel callets creates a velvety ganache with deep, indulgent flavours.
Natural Raspberry Filling: The use of natural raspberry preserves adds a burst of tangy sweetness without artificial additives, enhancing the overall flavour profile.
Creamy Pistachio Buttercream: The buttercream frosting, made with creamy premium unsalted butter, homemade pistachio ganache, extra fine icing sugar and a touch of vanilla extract, complements the cake perfectly, adding a creamy and heavenly sweet finish.
Garnished to Perfection: A sprinkle of finely ground pistachios and fresh raspberries not only adds visual appeal but also provides a delightful crunch and pop of colour.
Yield: 3-layer Cake
Servings: 12 slices.

WHAT YOU WILL NEED TO MAKE PISTACHIO RASPBERRY CAKE:
1. FOR THE PISTACHIO CAKE

2. FOR THE RASPBERRY FILLING

3. FOR THE PISTACHIO PASTE

4. FOR THE PISTACHIO GANACHE

5. FOR THE PISTACHIO BUTTERCREAM FROSTING

INGREDIENT NOTES:
Finely Ground Pistachio (also known as Pistachio Meal): You can use store-bought finely ground Pistachio Meal, which is made of 100% pistachio kernel for the convenience and consistent texture. Alternatively, if you prefer to make your own ground pistachios, start with raw pistachio kernels. Simply place them in a food processor or blender and pulse until finely ground, being careful not to over-process to avoid turning them into a paste.
Cake Flour: Sifting the cake flour before use helps to aerate it, resulting in a lighter and fluffier cake texture.
Buttermilk: Using room temperature buttermilk ensures even mixing and a smoother batter. If you don’t have buttermilk on hand, you can make a substitute by adding 1 tablespoon of lemon juice or vinegar to 1 cup of milk and letting it sit for 5-10 minutes before use.
Groundnut Oil: Groundnut oil also known as peanut oil, adds a subtle nuttiness to the cake and helps to enhance its moisture. If you have a peanut allergy or prefer a different oil, you can substitute it with a neutral-flavoured oil like canola oil or vegetable oil.
Raspberry Preserves: Opt for natural raspberry preserves without artificial additives for the best flavour and texture. Look for products made with real fruit and free from high fructose corn syrup and preservatives. Alternatively, you can make your own homemade raspberry jam for the cake filling. To do so, combine fresh raspberries (about 3 cups), granulated white sugar (about 1 cup or to taste), and lemon juice (1-2 tablespoons) in saucepan. Cook over medium heat, stirring occasionally, until the mixture thickens and coats the back of a spoon (about 15-20 minutes). Remove from heat, let it cool, and then use as a delicious homemade filling for your Pistachio Raspberry Cake.
Homemade Pistachio Paste: Making your own pistachio paste ensures freshness and quality. This paste is used to make the pistachio ganache.
Couverture Chocolate Caramel Callets: Choose premium chocolate caramel callets with at least 30% cocoa content for a rich and indulgent ganache. The caramel notes in the chocolate add depth to the flavour profile. For the best substitute, premium white chocolate couvertures can be used in place of the chocolate caramel callets. Ensure to use high-quality white chocolate for optimal flavour and texture.
Unsalted Butter: Using unsalted butter allows you to control the saltiness of the recipe. Make sure it’s softened to room temperature for easy blending.
Extra Fine Icing Sugar: Extra fine icing sugar ensures a smooth and creamy buttercream frosting. All our baked goods are reduced sugar recipes which it gives you a pleasant sweetness, you can adjust the amount of icing sugar as per your preference.
STEP BY STEP INSTRUCTIONS FOR THE PISTACHIO RASPBERRY CAKE:
PISTACHIO CAKE

1. Preheat your oven to 350°F (177°C). Grease three 8-inch round cake pans with baking spray or butter and line with non-stick parchment paper. Dust the pans lightly with flour, tapping out any excess. This helps for easy removal of the cake.


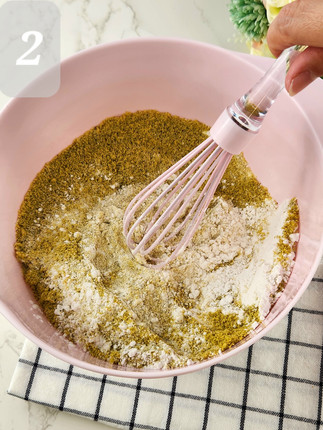


2. Mix Dry Ingredients: In a medium bowl, whisk together the finely ground pistachio, sifted cake flour, baking powder, baking soda, and salt until well combined. Set aside.


3. Cream Butter and Sugar: In a large mixing bowl with an electric hand mixer or a stand mixer, cream together the softened unsalted butter, and caster sugar on medium-high speed until light and fluffy.


4. Incorporate Groundnut Oil, Eggs and Vanilla Extract: Pour in the groundnut oil and mix until just incorporated. Add the eggs one at a time, beating well after each addition. Stir in the pure vanilla extract.


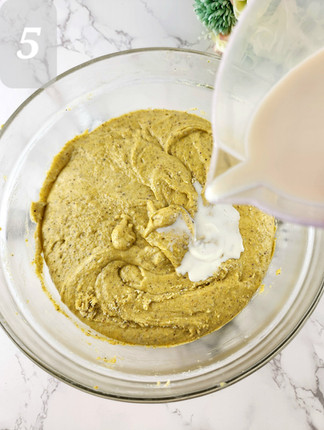
5. Combine Dry and Wet Ingredients: Adjust the mixer to low speed, and gradually add the dry ingredients mixture to the wet ingredients, alternating with the buttermilk, beginning and ending with the dry ingredients. Mix until just combined.


6. Divide the Batter: You can use an ice cream scoop to divide the batter equally between the three prepared cake pans and smooth the tops with a spatula.

7. Bake: Bake in the preheated oven for about 25-30 minutes or until a toothpick inserted into the center comes out clean.


8. Cool: Remove the cakes from the oven and let them cool in the pans for 10 minutes. You can use a dinner knife to cut the edges of the cake for easy removal. Discard the parchment paper and let the cakes to cool completely on a wire rack.
RASPBERRY FILLING

1. Preparation: While the cakes are cooling, prepare the raspberry filling. If using store-bought raspberry preserves, simply stir the preserves to soften and make them easier to spread. Transfer the raspberry preserves to a piping bag without nozzle. Set aside for later use.
PISTACHIO PASTE

1. Preparation: Measure out 1 ½ cups (about 150 grams) of the finely ground pistachios. Transfer the ground pistachio to a baking tray. If you prefer to use raw pistachio kernels, simply follow the same steps to make your pistachio paste.

2. Toasting: Lightly toast the finely ground pistachio in oven at 325°F (163°C) for 5-10 minutes.

3. Blending: Transfer the toasted ground pistachios to a food processor. Optionally, you can add a pinch of salt to enhance the flavour of the pistachio paste. Pulse the ground pistachios in short bursts to begin breaking them down into a paste-like consistency. Scrape down the side of the food processor as needed to ensure even blending. Continue blending until the pistachios release their natural oils and form a smooth and creamy paste. This process may take several minutes, depending on the power of your equipment. Set aside. Now you can start to make your pistachio ganache.
PISTACHIO GANACHE


1. Heating the Cream and Pistachio Paste: In a saucepan, heat up the heavy cream and pistachio paste over medium-low heat until reach a temperature between 175°F to 180°F (79°C to 82°C) or it starts to simmer. Once the mixture is hot, remove the saucepan from the heat.
2. Adding Couverture Chocolate Caramel Callets: Pour the cream and pistachio paste mixture into the chocolate caramel callets through a strainer to remove any potential lumps or bits of pistachio that didn’t fully blend. Stir gently until the chocolate callets are fully melted and incorporated into the ganache, creating a smooth and velvety consistency. Straining the mixture ensures a smooth and silky ganache without any unwanted texture or grit.


3. Covering the Pistachio Ganache: After preparing the pistachio ganache, cover it with food-grade cling wrap by pressing the wrap tightly onto the surface of the ganache. This step is essential to prevent a skin from forming on the ganache as it cools.
4. Cooling at Room Temperature or in the Refrigerator: When left the pistachio ganache cool at room temperature, ganache typically begins to thicken within 10-20 minutes, and it may take about 2-3 hours to reach a desired spreadable consistency depending on the warmth of the room and the amount of ganache. If you place the ganache in the refrigerator, it will cool and thicken more rapidly. It can reach a spreadable consistency in about 1 to 2 hours in the refrigerator.
Note: Once the pistachio ganache has cooled, use whisk to gently stir and smooth it out. Whisking helps to incorporate any separated fats and create a smoother texture.
PISTACHIO BUTTERCREAM

1. Creaming (Do Not Overbeat): In a mixing bowl, beat the softened unsalted butter on medium speed until creamy and smooth. Be careful not to overbeat the butter, as overmixing can incorporate too much air into the buttercream, resulting in a lighter and less stable frosting. This can affect the texture and stability of the frosting when decorating the cake.


2. Adding Icing Sugar: Gradually add the extra fine icing sugar and beat them on low speed until light and fluffy.


3. Mixing Ingredients: Mix in the 2/3 pistachio ganache and vanilla extract until well combined and creamy.
ASSEMBLE THE CAKE


1. Preparing the filling, ganache and frosting: Transfer 1/3 of pistachio ganache to a piping bag without a nozzle. Transfer 1/3 of the pistachio buttercream, also in a separate piping bag without a nozzle. Get ready the raspberry filling. Set three piping bags aside. This step ensures that you have the filling, ganache and buttercream ready for piping onto the cake layers, making the assembly process smoother and more efficient.
2. Levelling the Cake Layers: Once your cake layers are baked and cooled, use a long-serrated knife or a cake leveler to carefully trim the top dome of each cake layer. Hold the knife or leveler parallel to the countertop and gently saw back and forth to create an even, flat surface on each cake layer.
3. Stacking the Cake Layers: Once all three cake layers have been leveled and evened, begin stacking them on top of each other. You can put a cake board on the turntable before start to frost the cake for easy transfer the cake or simply put it on a cake plate, placing a thin layer of frosting on a cake board. This creates a stable and straight foundation for your layered cake.
4. To assemble the cake: Place one cake layer on the cake board. Trim off the top of the buttercream frosting piping bag and start to pipe a ring around the edges of the cake layer. And then, trim off the top of the pistachio ganache piping bag and start to pipe a spiral on the cake layer, spread evenly the ganache with an offset spatula.
5. Adding Raspberry Filling Layer: Pipe another filling layer of the raspberry preserves on top of the pistachio ganache layer, spread evenly the raspberry filling with an offset spatula. For those prefer less sweet version, you may add a thin layer of raspberry filling on each layer cake.
6. Top with second cake layer: Repeat adding the filling (refer to step 4 and 5).
7. Top with the final cake layer: Chill the cake in the refrigerator for about 20-30 minutes before frosting.
FROSTING AND GARNISHING

1. Frosting (Semi-Naked Style): Remove the cake from the refrigerator. Frost the top and sides with the pistachio buttercream frosting in a semi-naked style, leaving some of the cake layers visible for a rustic and elegant look. You can use a bench scraper to smooth the sides, and an offset spatula to smooth the top, by swiping the edges inwards or towards you.
2. Garnishing: Use a petal tip to pipe a zigzag line of the pistachio buttercream on top of the cake. Garnish the top of the cake with finely ground pistachios and fresh raspberries for a decorative touch.
SERVING AND STORING:
1. SERVING: Slice the Pistachio Raspberry Cake and serve chilled or at room temperature. Enjoy the delightful combination of flavours and textures in every bite!
2. STORING: Store any leftover cake in an airtight container in the refrigerator for up to 3-4 days.

PRO TIPS:
Room Temperature Ingredients: Ensure that your eggs, butter, and buttermilk are at room temperature before starting the recipe. This helps with even mixing and ensures a smoother batter.
Straining the Ganache: Strain the cream and pistachio paste mixture into the chocolate callets to remove any lumps or bits of pistachio that may not have fully blended. This step ensures a smooth and velvety ganache.
Chilling the Ganache: Allow the ganache to cool and thicken slightly at room temperature before using it. For a firmer consistency suitable for spreading or piping, refrigerate the ganache for at least 1-2 hours or until set.
Decorating with Garnishes: When garnishing the cake with finely ground pistachios and fresh raspberries, sprinkle them just before serving to maintain their freshness and visual appeal.
Experiment with Flavours: Feel free to experiment with different flavour variations. For example, you can add a touch of almond extract to the pistachio cake batter for added depth of flavour.
How to cut perfect cake slices, dip the knife into a cup of hot water before using. Be sure wiped it dry, then cut your slices while the knife is still slightly warm to the touch. And wiping off the knife in between each slice.

FREQUENTLY ASKED QUESTIONS:
Can I use store-bought pistachio paste instead of making it from scratch?
Yes, you can use store-bought pistachio paste if you prefer convenience. Just ensure it’s of good quality and adjust the quantity according to your taste preferences.
Can I use raspberry jam instead of raspberry preserves? What’s the difference between them?
Yes, you can use raspberry jam as a substitute for raspberry preserves in this recipe. The main different between raspberry jam and raspberry preserves lies in their texture and ingredients. Raspberry jam is typically smoother and may contain more sugar, resulting in a softer consistency. On the other hand, raspberry preserves often have larger fruit pieces and may contain less sugar, leading to a chunkier texture with more fruit intact. When choosing between jam and preserves, consider the desired texture and sweetness level for your recipe. Adjust the sugar accordingly if using jam to achieve the desired balance of flavours.
Can I substitute groundnut oil with another type of oil?
Yes, you can substitute groundnut oil with neutral-flavoured oils like canola oil or vegetable oil.
How long does the cake need to cool before adding the ganache and frosting?
Allow the cake layers to cool completely before adding the ganache and frosting. This typically takes about 1-2 hours at room temperature.
Can I make the cake layers in advance and assemble later?
Yes, you can bake the cake layers in advance and store them in an airtight container at room temperature for up to 1 day or in the refrigerator for up to 3 days. Bring them to room temperature before assembling the cake.
How long can I store the assembled cake?
It’s recommended to consume the cake on the day it is made for optimal taste and texture. However, if you need to store the assembled cake, it can be refrigerated in an airtight container for up to 3-4 days.
Can I freeze the cake layers or ganache for future use?
Yes, you can freeze the cake layers (unfrosted) wrapped tightly in plastic wrap and placed in a freezer-safe bag for up to 1 month. Thaw them in the refrigerator before using. The ganache can also be frozen in an airtight container for up to 2 months. Thaw it in the refrigerator and reheat gently before using.
Why is my buttercream frosting too runny and how to fix it?
1. Temperature: One common reason for runny buttercream is that the butter of the environment is too warm. Ensure that your butter is at a cool room temperature and that your kitchen is not too warm, especially during hot weather.
2. Butter Consistency: Softened butter is essential for buttercream, but if it’s too soft or melted, It can lead to a runny consistency. If this happens, place the buttercream in the refrigerator for 15-30 minutes to firm up slightly before using.
3. Sugar Ratio: The ratio of icing sugar or powdered sugar to butter affects the frosting’s thickness. If your frosting is too runny, gradually add more powdered sugar, a tablespoon at a time, and beat until you reach the desired consistency.
4. Chilling: If your buttercream is still too runny after adjusting the sugar, chilling it in the refrigerator for about 15-30 minutes can help firm it up. Be cautious not to chill it too long, as it can become too stiff to spread or pipe.
5. Slow Mixing: Avoid overmixing the buttercream, as this can introduce too much air and result in a lighter, softer texture. Mix on low speed until just combined and smooth.
Remember to leave a star rating and let me know how it turned out in the comment section below if you’ve tried and loved this recipe. Your support means a lot to me ❤️

Comments