.png)
These Mini Cheesecakes are luxuriously creamy with delicate texture and deliciously paired with a buttery cookies crust. Topped with fresh strawberry and sprinkled with snow powder for a simple and elegant look.
Fresh strawberry topping is a great choice to complement the buttery cookie crust and creamy cheesecake filling. Enjoy this indulgence dessert till the last bite!
If you are looking for richly decadent Cheesecake and not overly sweet dessert, our Easy Mini Cheesecakes recipe is just right for you.

The Easy Mini Cheesecakes recipe offers a delightful and hassle-free way to indulge in creamy goodness of cheesecake with individual servings and versatile toppings. These indulgent treats are a must-try for any dessert lovers. Whether you’re hosting a gathering or a party celebration or simply craving an indulgent dessert, these mini cheesecakes are sure to impress!

RECIPE HIGHLIGHTS:
Quick and Easy Preparation: The Easy Mini Cheesecakes recipe stand out for its simplicity. With simple and easily accessible ingredients, straightforward step-by-step instructions, even novice bakers can achieve fantastic results. The buttery cookies crust comes together effortlessly, while the creamy cheesecake filling requires minimal mixing process. In no time, you’ll have a batch of delectable mini cheesecakes ready to tantalize your taste buds and surprise your quests.
Quick Baking Time: They only bake about 20 minutes in the oven and no water bath is needed.
Individual-Sized Portions: One of the charms of this recipe lies in its individual-sized portions. Each mini cheesecake is a perfectly portioned delight, eliminating the need for slicing before serving. These individual servings make them ideal for gatherings or parties.
Creamy and Rich Cheesecake Filling: The star of these mini cheesecakes is undoubtedly the luscious and velvety cheesecake filling. Made with cream cheese, sugar, eggs, heavy cream, lemon juice and a touch of vanilla extract, the filling strikes the perfect balance between creaminess, sweetness and tanginess. The smooth delicate texture and creamy consistency will leave you longing for more.
Versatile Base Options: While the digestive biscuits crust is undeniably popular and delicious, the Easy Mini Cheesecakes recipe allows for creative variations. You can experiment with different crust options to suit your preferences such as classic graham cracker, Oreo cookies crumbs, Lotus Biscoff crumbs or vanilla wafers. The possibilities are endless, adding a touch of personalization to your mini cheesecakes.
Customizable Toppings: The beauty of mini cheesecakes lies in their ability to be adorned with various toppings. From fresh berries to decadent chocolate sauce, caramel drizzle, lemon curd or berries pie filling, the choice is yours. The blank canvas of the mini cheesecakes allows you to customize them according to your liking and create a visually appealing dessert that caters to your taste buds.
Servings: 12 mini cheesecakes (cupcake or muffin size).

WHAT YOU WILL NEED TO MAKE THESE MINI CHEESECAKES:

INGREDIENT NOTES:
Digestive Biscuits: I prefer to use Digestive biscuits for the cheesecake crust. They are less sweet and have a subtle nutty flavour that complements the creamy cheesecake filling. You can also substitute with graham crackers or other flavour of crushed cookies for the crust, depending on your preference.
Melted Butter: Highly recommend opting for unsalted butter, to have better control over the salt content in the recipe. Melted butter is used to bind the crust together and give it a rich and buttery flavor.
Cream Cheese: Cream cheese is the main ingredients in the cheesecake filling, providing creamy and tangy flavor profile. It’s important to use softened cream cheese or room temperature for a smooth and lump-free texture.
Sugar: I prefer to use caster sugar in baking. Caster sugar, also known as superfine sugar, it has more finely grains than granulated sugar which means it dissolves faster into the batter than granulated sugar. If you don’t have caster sugar in your pantry, granulated sugar will work just fine as caster sugar alternative. (Note: No additional sugar is added for the crust base in this recipe).
Eggs: Eggs help to bind the ingredients together and give structure for the cheesecake and creamy texture. Make sure to use large eggs (In the shell weight about 55G-60G each). Incorporate eggs into the batter one at a time, ensuring they are well-combined before adding the next.
Heavy Cream: Heavy cream enhances the richness and creaminess for the cheesecake filling. It also adds a smooth and velvety texture to the final product. If you prefer a lighter version cheesecake, you can substitute with sour cream for a tangier taste.
Lemon Juice: Lemon juice provides a subtle tanginess. It helps balance the sweetness and adds a refreshing touch to the cheesecake feeling. Freshly squeezed lemon juice is recommended for the best flavour.
Vanilla Extract: Vanilla extract enhances the overall flavor profile of the cheesecake, adding a warm and aromatic essence. Use pure vanilla extract for the best results.
All Purpose Flour: A small amount of all-purpose flour is added to the cheesecake filling to help stabilize it and prevent cracking.
Snow Powder: Snow powder also known as snow sugar or dusting sugar. It is a non-melting form of powdered sugar or icing sugar, often used for dusting on top of cakes, pastries, and other sweet treats to create an appealing snowy effect.

STEP BY STEP INSTRUCTIONS FOR THE CRUST:

1. Preheat the oven to 325°F (163°C). Line 12-count muffin pan with muffin paper liners and set aside.


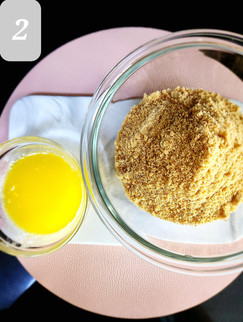


2. Blending: Blend the digestive biscuits into fine mixture using a food processor. Pour into a medium bowl and add in the melted butter. Mix well using a spoon until the mixture resembles wet sand texture. If you don’t have a food processor in your kitchen, you can place the digestive biscuits into a food-grade zip lock bag and crush them with a wooden rolling pin or a food mallet.


3. Equal portion: Divide the crust mixture evenly among the 12 muffin paper liners, pressing it down firmly using a shot glass or a wooden tart presser or a spoon.

4. Bake the cookies crust at the preheated oven at 325°F (163°C) for about 8 minutes until fragrant and/or slightly darker golden brown. Remove from oven, set aside.
STEP BY STEP INSTRUCTIONS FOR THE CHEESECAKE:


1. Preheat the oven to 325°F (163°C). Beating the cream cheese: In a large bowl with an electric hand mixer (or the bowl of a stand mixer with the paddle attachment), beat the softened cream cheese on low speed until cream cheese is loosen for about 1-2 minutes.
Mix in the sugar: Gradually add in sugar and continue to beat them together on low speed until smooth and creamy, about 2 minutes. Stop and scrap down the side of the bowl with a rubber spatula.


2. Mix in the eggs: Add eggs one at a time, beating well after each addition.


3. Mix in the liquid ingredients: Add in heavy cream, vanilla extract and lemon juice, continue to bind in on low speed for less than 1 minute. Scrap down the side of the bowl as needed.


4. Mix dry ingredients with wet ingredients: Stir in the flour and mix well with a rubber spatula. Scrap down the side of the bowl and mix until completely smooth. Make sure don’t over-mix the batter.


5. Fill in the batter: Spoon the smooth batter evenly over the crust in each muffin paper liner. The batter will not rise much at all during this low temperature and slow bake, so you can fill it up almost to the top.

6. Bake at the preheated oven 325°F (163°C) for 18-20 minutes or until the edges are set but centers still have a slight jiggle.

7. Cooling: Turn oven off but leave door closed and allow the mini cheesecakes to rest in the oven for about 20 minutes. Remove from oven and transfer the pan on a wire rack and allow to cool to room temperature for 30 minutes.

8. Chilling: Once cooled, wrap the pan tightly with food-grade plastic wrap and chill them in the fridge for at least 4 hours before servings. For the best results, preferably chill them in the fridge overnight. This allows the flavours to develop and the texture to set.


9. Ready to serve: Once chilled, you can add any desired toppings and serve.
PRO TIPS:
Room temperature: Make sure the ingredients are at room temperature, especially the cream cheese and eggs, is crucial for a smooth and well-incorporated cheesecake filling. Room temperature cream cheese blends more easily, resulting in a creamy texture without lumps. Cold ingredients can lead to an uneven mixture, affecting the overall consistency of the cheesecakes.
Do not over-mix When combining the ingredients for the cheesecake filling, it’s important not to over-mix once the eggs are added. Over-mixing will incorporate excess air into the batter, leading to a lighter and fluffier texture, and it will also increase the risk of cheesecake cracking during baking. Mix the ingredients on low speed until the ingredients are just combined and smooth, ensuring a creamy and dense texture.
Low temperature: Baking the mini cheesecakes at a low temperature, typically around 325°F (163°C), this helps to ensure gentle and even heat distribution. This low temperature baking process helps prevent the cheesecakes from rising too quickly and then sinking or cracking as they cool.
Conventional: Using a conventional mode (without fan-assisted) is recommended for baking the mini cheesecakes, ensuring consistent low-heat distribution and even baking.
Do not over-bake: To achieve the perfect texture, avoid over-baking the mini cheesecakes. The edges should be set and the centers should still have a slight jiggle when gently shaken. Over-baking can lead to a dry texture and will cause the cheesecake crack, rather than the creamy and smooth consistency desired in the cheesecakes. Set a timer for the baking time as recommended in the recipe and test for doneness to ensure optimal results.

STORAGE AND SERVING TIPS:
Store the baked mini cheesecakes in an airtight container in the refrigerator for up to 3 days. For the best results, store the baked mini cheesecakes without toppings.
Before serving, you can add various toppings like fresh berries, chocolate sauce, caramel sauce, lemon curd or berries pie filling.
MORE GARNISHING IDEAS:
Top with a drizzle chocolate ganache and a fresh raspberry.
Top with salted caramel pecans.
Dust with cocoa powder for an elegant touch.

FREQUENTLY ASKED QUESTIONS:
Can I make these cheesecakes ahead of time?
Absolutely! Mini cheesecakes can be made a day in advance and store them in refrigerator.
Can I replace heavy cream with something else for this recipe?
Yes, you can replace it with a ratio 1:1 with full-fat sour cream or full-fat unsweetened Greek yogurt.
Can I use a different type of crust?
Yes, you can substitute digestive biscuits with graham cracker crumbs, Oreo cookies crumbs, Lotus Biscoff crumbs or vanilla wafers.
Can I put these cheesecakes at room temperature for a long time?
No, these mini cheesecakes should not sit out at room temperature for a long time. It should only be left at room temperature for not more than 2 hours.

Remember to leave a star rating and let me know how it turned out in the comment section below if you’ve tried and loved this recipe. Your support means a lot to me ❤️

Comments